Since Next.js 10’s release, they have added several additional features to their incredible React Framework for Production. Two of the best I fancied were the built-in Image Component and Automatic Image Optimisation features. It serves images in modern formats like WebP if supported by a browser that is smaller than the JPEGs. Google and Vercel team collaboration deliver us this crucial improvement to present images on a webpage in a performant way, following all the best practices.
E.g., they made width and height properties of images a requirement (unless layout=’fill’) to prevent cumulative layout shift (images jumping up and down on page load). It is a core web vital that Google will soon use in their search ranking. So using the next/image component in our next-apps is a no-brainer.
When deploying on Vercel, the adoption of next/image is seamless, without hassle. Everything works out-of-the-box. The hurdle arises when you proceed to Netlify or any other platform of your choice. Hence, next/image and API routes won’t work similarly on such platforms as you would expect them to.
But don’t dissolve in worry now! In this tutorial, I will discuss how, despite the problems, you can benefit from the reasonable defaults and best practices set by the team behind Next.js. Let’s start! ✨
Why Choose to Deploy on Netlify?
Vercel is a logical choice for Next.js apps, their exceptional support for server-side rendering being super cool. However, for organisation and private GitHub accounts, it leaves me with no choice but to move my personal/team projects to Netlify because of their generous free-tier. Another reason for Netlify could be that you have deployed your code on it, and do not want to bear the overhead of shifting to a different platform.
Recently, the Netlify team has been working round the clock to ease the integration of Next.js apps with their platform, which I will discuss further. Last, they support several frameworks like Gatsby, Vue, CRA, etc., creating a one-stop junction for all your frontend web deployments.
Problem Between Next’s Image Component and Netilify.
To deploy Next apps on Netlify, we need to run next export after building the app. It creates a static HTML export you can deploy to Netlify CDNs. Also, to make SSR work, the Netlify team introduced a plugin to build Next.js apps. Previously, this worked like a charm, but since the new Image Component’s arrival, some issues have cropped up.
On running next export while using next/image, the following error occurs:
Error: Image Optimisation using Next.js’ default loader is not compatible with `next export`.
This is because Image Component uses a proxy server (provided by Vercel) that optimises images on-demand, as and when users request them.
The example below shows the conversion:
// image.js

import Image from 'next/image';

export default function MyImage() {
  return (
    <Image
      src="/boop.jpg"
      alt="what a great boop"
      width="1368"
      height="1044"
      layout="responsive"
    />
  );
}}
The above code is rendered as.
/* image.html */

<div
    style="display: block; overflow: hidden; position: relative; box-sizing: border-2-box; margin: 0px;"
>
    <div
        style="display: block; box-sizing: border-2-box; padding-top: 76.3158%;"
    ></div>
    <img
        alt="what a great boop."
        src="/_next/image?url=%2Fboop.jpg&w=3840&q=75"
        decoding="async"
        sizes="(max-width: 640px) 640px, (max-width: 750px) 750px, (max-width: 828px) 828px, (max-width: 1080px) 1080px, (max-width: 1200px) 1200px, (max-width: 1920px) 1920px, (max-width: 2048px) 2048px, 3840px"
        srcset="
            /_next/image?url=%2Fboop.jpg&w=640&q=75   640w,
            /_next/image?url=%2Fboop.jpg&w=750&q=75   750w,
            /_next/image?url=%2Fboop.jpg&w=828&q=75   828w,
            /_next/image?url=%2Fboop.jpg&w=1080&q=75 1080w,
            /_next/image?url=%2Fboop.jpg&w=1200&q=75 1200w,
            /_next/image?url=%2Fboop.jpg&w=1920&q=75 1920w,
            /_next/image?url=%2Fboop.jpg&w=2048&q=75 2048w,
            /_next/image?url=%2Fboop.jpg&w=3840&q=75 3840w
        "
        style="visibility: visible; position: absolute; inset: 0px; box-sizing: border-2-box; padding: 0px; border-2: none; margin: auto; display: block; width: 0px; height: 0px; min-width: 100%; max-width: 100%; min-height: 100%; max-height: 100%;"
    />
</div>
The image URL was changed from /boop.jpg to /_next/image?url=%2Fboop.jpg&w=750&q=75.
/_next/image— this is an endpoint where the image will be sent for processing.?url=/boop.jpg— where the endpoint should load the image from.&w=750— resize the image to 750px wide.&q=75— resample the image at 75% quality to reduce the file size.
This proxy URL is unique and thus can be cached, preventing redundant image optimizations. The default loader relies on the Image Optimisation API, which is unavailable for exported-applications, for Next.js tunes images on-demand, as users request them (not at build time).
Here, we have a list of solutions at hand, that is to
- use
next start, which starts the Image Optimisation API. This would need a physical or cloud server, rendering you responsible for its management and monitoring. - use Vercel for deploying, which supports Image Optimisation.
- use the solution provided by the
next-on-netlifypackage. - configure a third-party loader in
next.config.js. (e.g., Cloudinary, Akamai and so forth)
For this tutorial, the last two solutions will suffice us. We shall make use of a simple Image Optimiser provided to us by the package next-on-netlify (originally demonstrated by Jason 🙏) which uses jimp under the hood. But that is just a plain API, not performant enough as against the one provided by Vercel. Therefore, we will apply Cloudinary as the default loader, being compatible with Netlify and other hosting platforms.
Using the Next-On-Netlify Package.
With sheer perseverance, the team at Netlify have been toiling to provide one-click integrations for Next.js apps. They have prepared a package called next-on-netlify(currently in beta). You can also install a separate build plugin called @netlify/plugin, which uses the above package under the hood. We are going to use the next-on-netlify for now, just to show the deployment process. So, prep your editors up! 📝
Can't wait to see the final results? Head on to the demo repo
Create a New Next App
The first step involves creating a brand new Next.js app. If you already have one, you can skip this part. Just make sure you have the latest version of Next.js installed.
yarn create next-app
Install the Package
Now we will install the next-on-netlify package. While drafting this article, I was on v2.8.6, so update to the latest version as it often inculcates revisions.
yarn add next-on-netlify
Create netlify.toml
This involves telling Netlify how to build our Next.js app, and which folders to upload to its CDN. We answer that with a netlify.toml file in our root directory and the instructions below:
# netlify.toml

[build]
  command = "yarn run build"
  functions = "out_functions"
  publish = "out_publish"
This would create two folders: viz out_publish, including all static elements; out_functions, containing all the API routes’ implementations.
The names
out_functionsandout_publishare hard-coded, therefore not configurable at the moment.
Add a postbuild Hook
Paste the following line of code in your package.json.
// package.json

{
...
"scripts": {
    "dev": "next",
    "build": "next build",
    "postbuild": "next-on-netlify"
},
...
}
When you run the build command, the postbuild hook will be fired automatically, driving the next-on-netlify command for us which makes use of the netlify.toml file we created earlier.
Create next.config.js
Now the call is to build our Next.js app as a serverless app. Just create a next.config.js file in your root directory and write:
// next.config.js

module.exports = {
    // Target must be serverless
    target: "serverless",
};
Let’s Create a Production Build
We are almost there! Time to build our app by running yarn run build. When the build finishes, you’ll see some terminal messages, where next-on-netlify creates folders to upload to Netlify CDNs. Add these folders to .gitignore, having no point in committing them to version control.
# .gitignore
# Files generated by next-on-netlify command
/out_publish/
/out_functions/
Let’s Deploy 🚀🚀🚀
Last, to deploy using the terminal, you need to install netlify-cli and log in using the cmd netlify login.
After your successful login, run netlify deploy to start a deployment. If a new project, it will ask you to configure one for this site or add this site to an existing project. Now, select appropriately and wait for the deployment to finish.
Following the fruitful deployment, you will get a preview URL. Check if everything works as intended, and then run netlify deploy --prod to get the production URL.
Good going! ⚡ We have deployed our boilerplate application as operational on the web. Let’s add some images and optimise them.
Add Images
Download images and move them to the public folder.
Check out the commits on this PR where I add basic markup and styling to display images. Also, you can clone use-next-on-netlify branch of the demo repo.
Rebuild and Deploy
Run yarn build and wait for the build process to complete.
Head onto the generated out_functions folder where you can see a file named next_image.js. On deployment, this file will be uploaded to Netlify Functions and act as our Image Optimiser. Also, note that the out_functions folder contains other files as well, which are our API routes implementations. All of these files will be deployed as separate Netlify Functions.
Now, if look into the out_publish folder, you will see other static files and images, ready to be uploaded. Here, the next-on-netlify package has generated a _redirects file for us, containing the following code:
# _redirects
# Next-on-Netlify Redirects
/api/hello  /.netlify/functions/next_api_hello  200
/_next/image*  url=:url w=:width q=:quality  /.netlify/functions/next_image?url=:url&w=:width&q=:quality  200
The first redirect is for our pages/api/hello.js which was already present when we created a new next-app. The second redirect is redirecting the traffic going from URLs containing /_next/image to /.netlify/function/next_image with all the query parameters.
This happens because developers of the next-on-netlify package are currently working to create their image optimiser function, naming it as next_image.js. If you want to look at how are they doing it, check out this file.
On the successful build, check the preview URL by running netlify deploy. Whereupon, run netlify deploy --prod to push towards production.
Bravo! ⚡ We have successfully made the Next.js Image Component work with Netlify! But it does not end here. As you can notice, on visiting the preview URL, the images load slow. So, let’s advance and solve this in the next section.
Using Cloudinary as Default Loader.
The problem with the above Image Optimizer is that it skipped quite a few optimisations like conversion to WebP formats, caching images on the browser, etc. If you go to the deployed version of this section, you find the first two images load slower than the last two. This is because Cloudinary optimises and caches the final two.
Implementing these much-needed features alone would be tedious. And you know what they say, "Don’t reinvent the wheel."
[Update 21/4/21]: Folks from Cloudinary reached out to me today to fix a mistake below in the URL to deliver resources. Earlier, I reffered to CLOUD_NAME as PUBLIC_ID in the URLs and the image below that are incorrect. I have updated them to follow the correct convention.
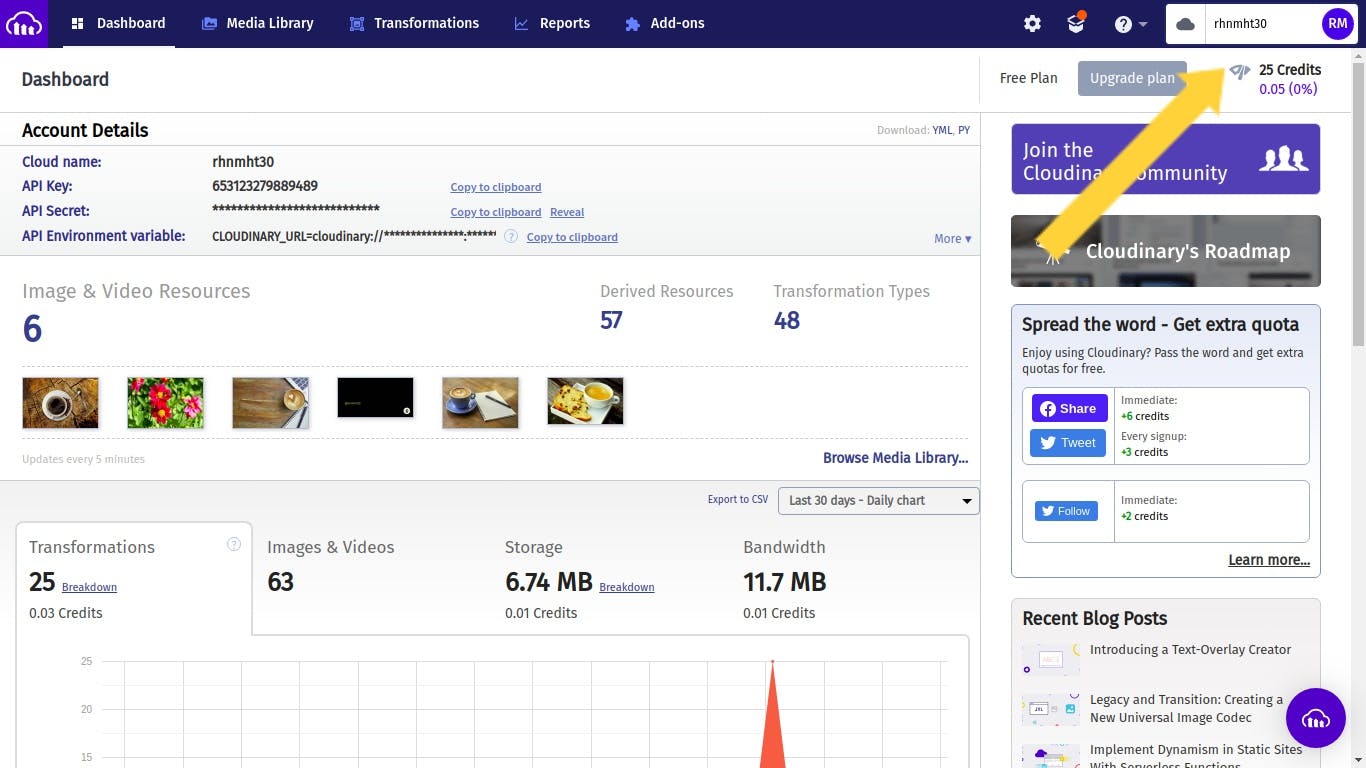
Set-Up a Cloudinary Account
After finishing the sign-up process, note down your cloud name as shown in the image below:

Now, to use our images with Cloudinary, we have two options, either to
- upload all our images to Cloudinary, and use
https://res.cloudinary.com/CLOUD_NAME/image/upload/IMAGE_NAME.jpgto fetch it - or provide absolute URL of the image hosted on the platform of our choice to Cloudinary like
https://res.cloudinary.com/CLOUD_NAME/image/fetch/https://YOUR_PROVIDER.com/IMAGE_NAME.jpg
If you get 404 errors on fetching images the second way, log into your cloudinary account, goto settings -> security and un-check the Fetched URL checkbox under Restricted media types option. It allows us to use any image URL. To prevent misuse, provide the list of accepted domains under the Allowed fetch domains option.
To use Cloudinary as the default loader with Next.js Image Component and get the same results, we have two ways:
By Using Loader Prop (requires next v10.0.5)
Since v10.0.5, Next.js adds loader prop to the Image Component. It takes a custom loader function as the prop, receiving src, width and quality as arguments.
Here lies the implementation of custom Image Component with loader prop:
// components/MyImage.js

import Image from "next/image";

const myLoader = ({ src, width, quality }) => {
    return `https://res.cloudinary.com/CLOUD_NAME/image/upload/w_${width},q_${
        quality || 75
    }/${src}`;
};
const MyImage = (props) => {
    return <Image loader={myLoader} {...props} />;
};

export default MyImage;
Use the above component as shown below:
// pages/index.js

import MyImage from "../components/MyImage";

//...

<MyImage key={i} src={`/coffee-1.jpg`} width={640} height={426} />;

//...
Check out the PR and the deploy preview URL for this method and compare the performance difference.
By Specifying Loader and Path in next-config.js
Now, we will discuss another method to use Cloudinary as the default loader in which you need not create a new component as we did in the previous method.
In the next-config.js, add the following code to use Cloudinary as the default loader:
// next.config.js

module.exports = {
// Target must be serverless
target: "serverless",
images: {
        loader: "cloudinary",
        path: "https://res.cloudinary.com/CLOUD_NAME/image/upload/"
    },
};
Since the Next.js docs officially list Cloudinary as an option for loaders, the second method scores better. On debugging, I found, by using loader prop for Cloudinary, images weren’t being converted to WebP, while in the second method it was. I assume there is some kind of extra configuration by the Next.js team under the hood.
Check out the PR and the deploy preview URL for this method and compare the performance difference.
Conclusion
Congratulations on reaching the end! 🎉
Now you know the two ways to function the Next.js Image Component with Netlify. I would suggest using Cloudinary as the default loader until the wonderful developers of next-on-netlify release a performant Image Optimiser.
In my deployed demo, I have used the most performant one. But you can check these deploy URLs and respective PRs to get an understanding.
- Using
next-on-netlify: PR(#1) and deploy preview. - Using custom loader prop: PR(#2) and deploy preview.
- Using Cloudinary as default loader: PR(#3) and deploy preview.
In search of more examples? Check out my PR on this repo where I am converting my community’s website, deployed on Netlify, to use Next 10 and Tailwind CSS.
Shout out to Manya for editing my drafts. 💜
Have a good one. 🍻
Rohan